
Exploring the World of Containerization: A Closer Look at Overlay Filesystems
Understanding the Backbone of Data Management in Containers


Welcome to the third installment of our blog series, "Exploring the World of Containerization: A Closer Look at Overlay Filesystems." As we continue our journey through the multifaceted world of containerization, this part shifts our focus to one of the key architectural elements that underpin container technology: overlay filesystems.
In this segment, we'll unravel the complexities of overlay filesystems and their critical role in efficiently managing data within containers. This technology is not just a cornerstone in the structure of containerized environments, but it's also a catalyst in the dynamic world of software development and deployment.
Join us as we dissect the layers of overlay filesystems, understand their functionality, and explore why they are indispensable in the realm of containerization.
Table of Contents
Welcome to our comprehensive series on containerization. Below is the list of our published installments, each delving into different aspects of container technology:
Part 1: Exploring the World of Containerization: A Journey Through Linux Namespaces
In the first part of our series, we embarked on an introductory journey through the basics of Linux namespaces, laying the foundation for understanding containerization. Dive into the world of filesystem isolation and how it plays a crucial role in container environments.
Part 2: Exploring the World of Containerization: A Closer Look at IPC and UTS
Our second installment took a closer look at Interprocess Communication (IPC) and UNIX Time-Sharing System (UTS) namespaces. Here, we explored how containers manage internal communication and system identity to maintain isolation and security.
As we embark on the third part of our series, "Exploring the World of Containerization," let's briefly revisit our initial steps. In the first part, we delved into the isolation of filesystems using the --mount flag. We downloaded the Alpine Linux filesystem to serve as the root for each namespace and used pivot_root to switch each namespace to its new root filesystem. This approach effectively isolated the filesystems, giving each namespace its own separate environment.
However, this method introduces a significant challenge, especially when we consider scaling up. Imagine the scenario where instead of just two namespaces, we want to create hundreds or even thousands. Each of these namespaces would require its own root filesystem. This quickly leads to a substantial issue: disk space. Duplicating the entire root filesystem for every namespace consumes a lot of disk space, which is neither practical nor efficient in larger-scale operations.
How do we resolve this dilemma? The answer lies in an innovative approach to filesystem management within containerized environments – an approach that allows for both efficiency and scalability without the hefty disk space requirement. This brings us to the core topic of our current discussion: overlay filesystems.
In this part, we'll explore how overlay filesystems provide an elegant solution to this challenge. They allow us to maintain the necessary isolation and independence of containers while being significantly more space-efficient. Let's dive into the mechanics of overlay filesystems and understand how they revolutionize data management in containerized environments.
Understanding Overlay Filesystems in Linux
Overlay filesystems in Linux are a sophisticated file system service that allows for the layering of two or more directories into a single, unified view. This technology is integral to Linux and offers a flexible way to manage files across different system layers. Let’s unpack the concept and functionalities of overlay filesystems:
How Overlay Filesystems Work:
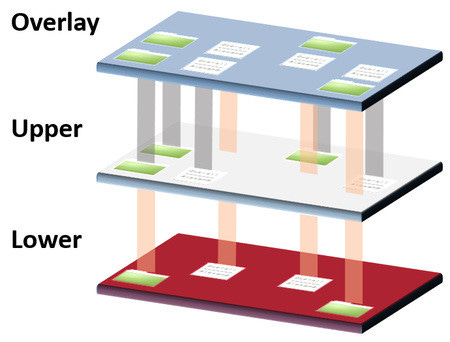
Layering: An overlay filesystem typically consists of two primary layers - the lower layer and the upper layer.
The lower layer is read-only and contains the base files and directories. This is the foundational layer where the default system files reside.
The upper layer is read-write, where changes to the filesystem are made. When a file from the lower layer is modified, it's copied up to the upper layer (a process known as copy-on-write), and the changes are applied there.
Merging: These layers are then merged into a single, cohesive filesystem. From a user's perspective, it appears as one directory tree, seamlessly integrating files and directories from both layers.
Benefits:
Efficiency and Space Saving: By sharing the lower, read-only layer across multiple instances, overlay filesystems are incredibly space-efficient. They eliminate the need to duplicate common files, saving valuable disk space.
Flexibility: Overlay filesystems allow users to work with a customized environment without altering the base system. Any changes are applied to the upper layer, leaving the lower layer unmodified.
Applications:
While commonly associated with containerization, overlay filesystems have a variety of uses outside of containers. They are useful in scenarios where a temporary, modifiable environment is needed atop a stable base system.
For instance, in software testing, an overlay filesystem can allow testers to modify system files without the risk of altering the core system files.
Overlay filesystems represent a powerful concept in Linux, offering both flexibility and efficiency in managing files. They allow for dynamic modifications while maintaining the integrity of the base system, a critical aspect in many advanced Linux operations.
DEMO: How to Create an Overlay Filesystem
Before proceeding with the setup and mounting of the overlay filesystems, it's crucial to note that these commands should be run in the parent namespace, not within the namespaces themselves. This ensures that the overlay filesystems are correctly set up from the parent environment, allowing for proper isolation and functionality of each namespace.
Creating an overlay filesystem involves setting up a series of directories that act as the lower layer, upper layer, work directory, and the overlay layer itself. Follow these steps to set up a basic overlay filesystem:
Open a Terminal: Begin by opening a terminal on your Linux system.
Create Necessary Directories:
First, create a directory to act as the lower layer with the alpine FS in it. This will hold the base files that are read-only.
mkdir /home/iammuho/root_fsAs we have downloaded the AlpineFS in the first part of that series, we can extract the AlpineFS into the root_fs directory.
tar -xzf alpine-minirootfs-<version>.tar.gz -C /home/iammuho/root_fs/ Create directories for the upper layer of each namespace. These will store modifications.
mkdir /home/iammuho/namespace1
mkdir /home/iammuho/namespace2
Create work directories required for the overlay filesystem's operational needs.
mkdir /home/iammuho/workspace1
mkdir /home/iammuho/workspace2
Finally, create directories for the overlay layers of each namespace. These will present the unified view of the lower and upper layers.
mkdir namespace1_overlay
mkdir namespace2_overlay
Step 3: Mount the Overlay Filesystems
namespace 1:
sudo mount -t overlay overlay -o lowerdir=/home/iammuho/root_fs,upperdir=/home/iammuho/namespace1,workdir=/home/iammuho/workspace1 none /home/iammuho/namespace1_overlaynamespace 2:
sudo mount -t overlay overlay -o lowerdir=/home/iammuho/root_fs,upperdir=/home/iammuho/namespace2,workdir=/home/iammuho/workspace2 none /home/iammuho/namespace2_overlay
Each of these commands will create an overlay filesystem for the respective namespace, enabling separate environments that share the same base filesystem but have their own space for modifications.
To confirm that our new overlay filesystems are correctly mounted, we can use the df -a command. This command displays information about all mounted filesystems, including overlay ones. Here's how to proceed:

Great! Now we can re-create the namespaces;
namespace 1:
sudo unshare -p -f -m -u -i --mount-proc /bin/bashnamespace 2:
sudo unshare -p -f -m -u -i --mount-proc /bin/bashAnd now, let’s repeat the commands from the first path (apply for each namespace)
cd /home/iammuho/namespace1_overlay
mkdir old_root
pivot_root . old_root/
export PATH=$PATH:/home/iammuho/namespace1_overlay/bin
And we're done! Following the initial tests we conducted in the first part of our series, you can now verify that our overlay filesystem is fully isolated, even though it uses the same lower layer filesystem across different namespaces. This setup demonstrates the effectiveness and efficiency of overlay filesystems in maintaining isolation while sharing base resources.
A Deeper Insight into Overlay Filesystems
Shared Lower Layer: The lower layer of the overlay filesystem, which in our case contains the Alpine Linux filesystem, is shared across namespaces. This layer is read-only, ensuring that the base files remain consistent and unaltered across different environments.
Unique Upper Layers: Each namespace has its own upper layer, where all the changes, modifications, and new files are stored. This separation is crucial as it allows each namespace to have a personalized environment without affecting the shared lower layer or other namespaces.
Merging Layers: The overlay filesystem smartly merges these layers (the shared lower and unique upper layers) to present a unified filesystem to each namespace. From the perspective of a process running in a namespace, it appears as though it has its own dedicated filesystem.
Example 1: Creating a New File in /tmp
Suppose a user within namespace1 wants to create a new file in the /tmp directory:
When they create a file, say
tmpfile.txt, in/tmp:
touch /tmp/tmpfile.txtThis file is stored in the upper layer of
namespace1. The lower layer remains unchanged because it is read-only.The overlay filesystem reflects this new file in the merged view. However, this file is unique to
namespace1and won't be visible in other namespaces.
Example 2: Modifying a Shared File in /etc
Now, consider a scenario where a user in namespace1 wants to modify a shared file, like /etc/profile, which originates from the lower (shared) layer:
If they edit
/etc/profile:
nano /etc/profileThe overlay filesystem performs a "copy-on-write" operation. This means the original
/etc/profilefile from the lower layer is first copied to the upper layer ofnamespace1.Any modifications are then applied to the copy in the upper layer.
In the merged view presented to
namespace1, the modified/etc/profileis seen. However, these changes are isolated tonamespace1. The lower layer's version of/etc/profileremains intact and unaltered.As a result, other namespaces will still see the original, unmodified version of
/etc/profilefrom the lower layer.
Understanding Overlay Filesystems in Docker
Docker's Layered Approach
Docker utilizes overlay filesystems to manage and optimize the storage of container images and runtime environments. This is particularly evident in how Docker handles its image layers:
Image Layers:
Docker images are composed of layers. Each layer represents a set of differences or changes. When you pull an image from a registry or build an image, Docker fetches these layers and stacks them on top of each other.
These layers are read-only and correspond to the lower layer in an overlay filesystem. They include all the necessary components to run an application – from the operating system essentials to the specific application dependencies.
Container Layer:
When a container is launched from an image, Docker uses an overlay filesystem to add a read-write layer on top of the image layers. This is the upper layer where all changes made by the running container are stored.
Any modifications, such as adding, deleting, or updating files, are made in this writable layer. This ensures that the underlying image layers remain unchanged.
Efficient Storage and Isolation:
This approach is highly efficient as multiple containers launched from the same image share the image's read-only layers, significantly saving disk space.
The isolation of changes to the upper, writable layer of each container ensures that one container’s modifications do not affect another container or the underlying image.
Committing Changes:
If changes in a container need to be saved as a new image, Docker can commit these changes. This process involves creating a new layer with the modifications and stacking it on top of the original image layers, forming a new image.
As we wrap up today's exploration in "Exploring the World of Containerization," we've ventured into the intricate workings of overlay filesystems in Linux and their critical application in Docker. We've seen how these filesystems efficiently manage data through a layered approach, offering both space efficiency and isolation — key elements that power the world of containerized applications.
Today's journey has taken us through the practical implementation of overlay filesystems, demonstrating their role in maintaining file system integrity while allowing for customization and changes. In Docker, this technology forms the backbone of image and container management, showcasing the elegance and efficiency of containerization.
But our exploration does not end here. In our next installment, we'll delve into another fundamental component of containerization: cgroups. Cgroups, or control groups, are a Linux kernel feature that plays a crucial role in resource allocation and limitation for containers. Understanding cgroups will deepen our comprehension of how containers are managed and controlled at the system level, ensuring efficient and fair resource usage among multiple running containers.
Stay tuned for this exciting continuation of our series, where we'll uncover the secrets of cgroups and their pivotal role in the orchestration of container environments.