
Exploring the World of Containerization: A Journey Through Linux Namespaces
Part 1: Understanding Namespaces - The Foundation of Isolation in Containers"

Welcome to the first installment of our blog series, "Exploring the World of Containerization: A Journey Through Linux Namespaces." In this series, we're diving into the fascinating world of containerization, a cornerstone of modern software development and deployment. Our approach? We're using a unique analogy to make these technical concepts more relatable and easier to understand.
Scenario

Imagine "Harbor Haven" a bustling hotel where a diverse array of guests arrive and depart, each with their unique requirements and ways of life. In this setting, "Harbor Haven" isn't just a building with rooms; it's a complex ecosystem that seamlessly caters to the varied and often overlapping needs of its guests, even in some-ways, it’s “MAGICAL”
The hotel's primary goal is to ensure that each guest has a comfortable and enjoyable stay, without any disruptions from others. This involves a delicate balancing act of providing the right resources, attention, and space to everyone, regardless of whether they're families with energetic children, couples seeking a quiet retreat, or solo travelers on a business or leisure trip.
Let's introduce the various types of guests;
Families with Kids (The Multi-Taskers): These guests are often seen juggling multiple activities. In the hotel, they might be booking tours while managing kids' activities and planning their day. They require more resources (like extra beds and space).
Couples (The Focused Duo): These guests often have specific plans and require less intervention. They represent more streamlined processes that execute a specific task efficiently. In "Harbor Haven," they might be seen enjoying quiet dinners or relaxing in the lounge.
Solo Travelers (The Independents): These guests are self-sufficient, often in the hotel for business or solo adventures. In the hotel, they're likely to be found working in the café, exploring the city on their own, or enjoying some quiet time in their rooms.
Each type of guest at "Harbor Haven" illustrates a different way the hotel (akin to a computer system) accommodates varied needs, ensuring all guests have a pleasant and efficient stay. This analogy will later help in explaining how Linux namespaces manage different processes in a containerized environment.
Hotel Management : Parent (Default) Namespace
The parent namespace has comprehensive awareness and control over the child namespaces, just as the hotel management is aware of and manages the activities within each room.
In Linux, when you create new namespaces, they are typically children of the current namespace, which plays the role of the parent. This hierarchical structure allows the parent namespace to have a broader perspective and control over the child namespaces.
To understand your current namespaces in a Linux system, you can use the lsns command. This command lists the namespaces and their types that are active in your default (or parent) namespace. The output of lsns provides valuable insight into the various kinds of namespaces being used.
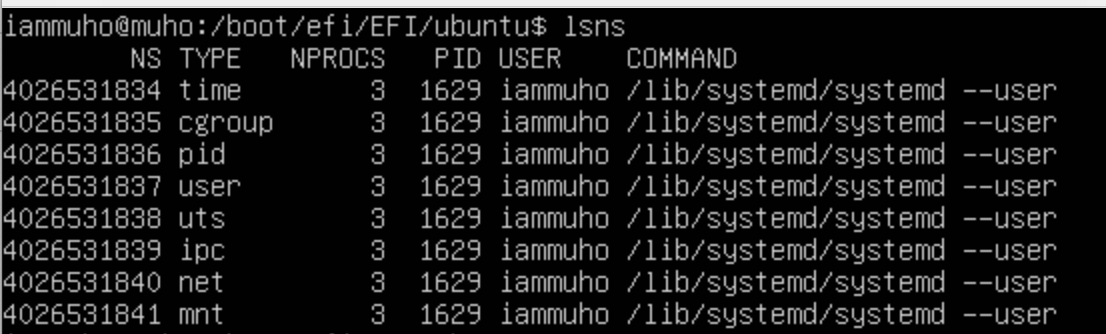
In the context of our hotel analogy, using the lsns command is like accessing a detailed directory or a management system in "Harbor Haven" that provides information about all the different types of rooms and services being utilized. Each type of namespace, as listed by lsns, can be compared to a different category or service within the hotel.
Let's explore these namespaces one by one, relating them to our story for a better understanding:
Room Numbers and Doors: Navigating the World of PID Namespaces

At "Harbor Haven," every guest seeks a personal haven, a space where they can enjoy complete privacy and freedom, oblivious to the existence of other guests. It's as if each room in the hotel exists in its own little world, separate from the rest. This unique feature of the hotel, almost magical in nature, ensures that guests don't just share a common space; they each inhabit their own individual universe within the hotel's walls.
In Linux, a PID namespace is a feature that provides isolation for the process ID number space.
Just as each room in the hotel is a private, isolated space where guests can live without awareness of others in different rooms, a process in a PID namespace is isolated in a similar way. It can operate independently, and its actions or changes do not affect processes in other PID namespaces. This isolation ensures a secure and stable environment, as processes cannot interfere with or see each other, similar to how guests in "Harbor Haven" enjoy their privacy.
This feature is crucial in containerization, where each container has its own set of processes. The PID namespace ensures that these processes are isolated and operate independently from those in other containers, providing a layer of security and efficiency, much like our hotel manages its diverse guests in separate rooms, maintaining harmony and order in the entire system.
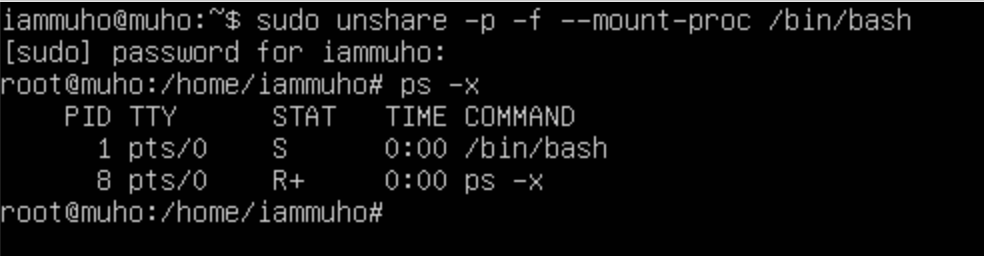
To create a new PID namespace, you use the unshare command with the -p and -f flags. The -p flag tells unshare to unshare the PID namespace, and the -f flag is used to fork a new process in this new namespace.
unshare -p -f --mount-proc /bin/bashHere's what happens with this command:
unshare -p -f: Creates a new PID namespace and forks a new shell process in this namespace.--mount-proc: Mounts the new/procfilesystem in the new namespace, which is necessary to see processes in the new PID namespace - will talk in a second./bin/bash: Runs a new shell in the new namespace.
As demonstrated, I've established a new namespace where processes are fully isolated within this namespace. To further illustrate this, let's create another distinct namespace. This time, for differentiation, I'll use /bin/sh to initiate it. Once this is done, we'll explore the processes within this newly created namespace to understand how they are isolated.
unshare -p -f --mount-proc /bin/sh
Here we go! We have completley isolated the processes of the namespaces.
Linux Insight: To navigate back to the primary namespace from a newly created one, simply type
exitor pressCtrl+D. This command effectively ends your session in the current namespace, seamlessly returning you to the original, parent namespace.
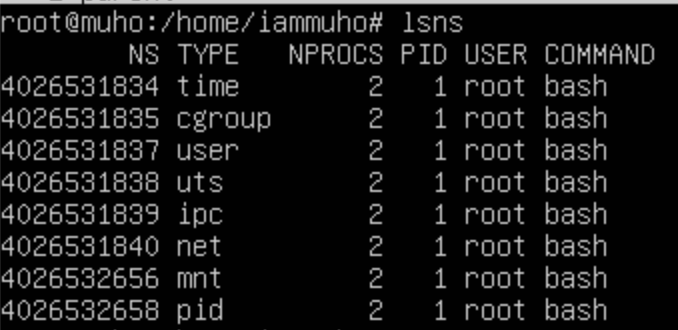
Also one another thing to mention the “lsns” under the new namespaces. We have already seen the output once we run that command under the parent (default) namespace. So let’s check this on both namespaces;
Namespace 1:
And namespace 2:
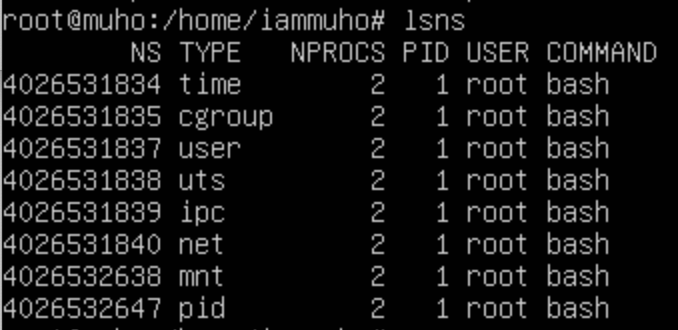
"Just 'mnt' and 'pid' types exhibit differences, with the rest being inherited from the parent.
The 'mount' type is distinct as well, due to the use of '--mount-proc', which will be the focus of our discussion next."
Understanding the "/proc" Filesystem and the --mount-proc Option
In Linux, the adage "everything is a file" rings particularly true, and this extends to processes as well. The /proc directory is a special filesystem in Linux that contains a wealth of information about the system's processes and other system information. It acts as a window into the kernel's view of each process.
When working with namespaces, particularly when creating new PID namespaces, the --mount-proc option plays a crucial role. This option essentially refreshes the /proc filesystem for the new namespace, providing an accurate and isolated view of the processes within that namespace.
Under the hood, when you use --mount-proc, the following actions are performed:
Unmount the existing
/procfilesystem: This step removes the current view of the/procfilesystem, which is tied to the parent namespace.
umount /procMount a new
/procfilesystem: This mounts a fresh/procfilesystem that is specific to the new PID namespace. This is crucial because it ensures that when you look into/procin this new namespace, you only see the processes that belong to it.
mount -t proc proc /procThis process is akin to updating a directory or a guest list in our "Harbor Haven" hotel analogy. Just as the hotel would update its guest list for a particular room when new guests check in, the --mount-proc command updates the /proc filesystem to reflect the processes running in the new namespace. This ensures that each namespace has an accurate view of its processes, isolated from the rest of the system.
Unique Spaces and Amenities: The Essence of Mount Namespaces

In the bustling world of "Harbor Haven" every room is not just a number on a door; it's a unique space with its own set of amenities and arrangements. Guests in one room might have a mini library, while another might boast a compact gym. This diversity in room features is crucial for catering to the individual preferences and requirements of different guests, ensuring that everyone's stay is as comfortable and personalized as possible.
This concept is strikingly similar to the role of mount namespaces in a Linux environment. Mount namespaces are about providing isolated filesystem views to different processes or groups of processes. They ensure that what one process sees in the filesystem can be entirely different from what another process sees, even though they are on the same physical machine.
Why is this isolation necessary? Just as in "Harbor Haven," where guests value their personalized space and amenities, processes in a system might require different views of the filesystem for security, privacy, or functionality reasons. For instance, one process might need access to certain system files that are irrelevant or even potentially harmful for another process to access.
Mount namespaces provide this level of isolation and customization, allowing each process to have its own unique view of the filesystem, tailored to its specific needs and functions. It's like each guest at "Harbor Haven" having their room tailored to their liking, ensuring a stay that's both secure and suited to their individual needs.
To delve into the technical aspect of mount namespaces in Linux, we'll start by modifying our previous unshare command to include the -m flag. This flag is crucial for creating a new mount namespace.
sudo unshare -p -f -m --mount-proc /bin/bash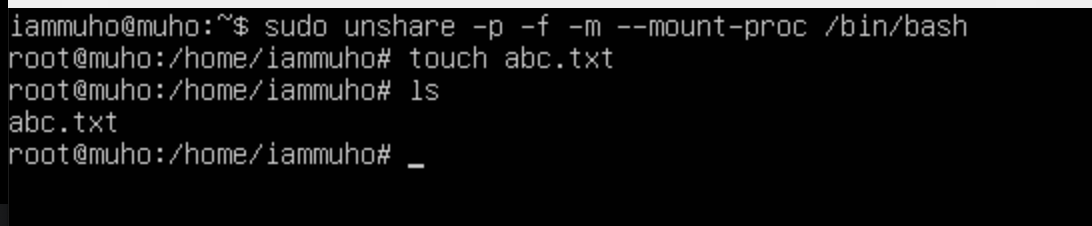
In the screenshots provided, we demonstrate the creation of a new namespace encompassing both PID and Mount types. Within this namespace, an abc.txt file was created.
Now, let's venture further. We'll establish another namespace, also incorporating PID and Mount types. The aim here is to investigate whether the abc.txt file, created in the first namespace, is visible or accessible from this newly created second namespace.

You've noticed that despite using the -m flag to create a new mount namespace, the abc.txt file created in the first namespace is visible in the second namespace. This visibility occurs because, by default, when a new mount namespace is created, it inherits the mount points of its parent namespace.
Solving the Visibility Issue
To address this visibility issue, I initially set up two separate directories in the parent namespace, intended to serve as the "root (/)" for our namespaces:
mkdir namespace1
mkdir namespace2
Once we have created the namespace1 and namespace2 directories, our next step is to prepare these directories to serve as standalone filesystems. This is crucial for ensuring that each namespace operates with its own isolated environment. Here’s how we proceed:
Installing a Minimal Filesystem:
Choose a lightweight, minimal Linux distribution like Alpine Linux. This distribution is ideal for such setups due to its small size and minimal resource requirements.
I’ll choose the the Alpine Linux root filesystem tarball on your host system https://alpinelinux.org/downloads/ (I choosed the minifs)
Populating the Namespaces:
Extract the Alpine Linux filesystem into each namespace directory. This can be done using a command like:
tar -xzf alpine-minirootfs-<version>.tar.gz -C /home/iammuho/namespace1/ tar -xzf alpine-minirootfs-<version>.tar.gz -C /home/iammuho/namespace2/These commands will populate
namespace1andnamespace2with a basic Linux filesystem, complete with essential binaries, libraries, and configuration files.


Next, we'll recreate the namespaces and mount these directories as their respective roots. Start by entering a new shell with namespace separation:
sudo unshare -p -f -m --mount-proc /bin/bashand then bind the “namespace1” into their very-own “namespace1”
sudo mount --bind /home/iammuho/namespace1 /home/iammuho/namespace1let’s confirm with “df -a” command.

…. Proceed with the same steps for "namespace2". ….

Once completed, both namespaces will have their mounts properly configured and ready.
Pivoting…
"Pivoting" in the context of Linux namespaces and containerization refers to a technique used to change the root filesystem of the running process. This is typically done using the pivot_root command.
Let's execute the pivot_root . command for each namespace, setting their respective namespace directories as their root:
For the first namespace:
Change to the directory of the first namespace:
cd /home/iammuho/namespace1/Create a directory to serve as the placeholder for the old root:
mkdir old_rootApply the
pivot_rootcommand, moving the current root toold_root:
pivot_root . old_rootFor the second namespace:
Navigate to the directory of the second namespace:
cd /home/iammuho/namespace2/Create a directory for the old root in this namespace as well:
mkdir old_rootExecute the
pivot_rootcommand to transition the root:
pivot_root . old_root
After changing our root directory, we encounter a situation where standard binaries are no longer accessible. This is because the system's $PATH variable, which determines where to look for executable files, still points to the locations in the old root. To resolve this, we need to update $PATH to include the paths of our new root directories.
For namespace1:
Update the $PATH variable to include the new root:
export PATH=$PATH:/home/iammuho/namespace1/binThis command appends the binary directory of namespace1 to the current PATH.
For namespace2:
Similarly, for namespace2, append its binary directory to the PATH:
export PATH=$PATH:/home/iammuho/namespace2/binThis adjustment allows access to the executables in the namespace2 root.

By making these changes, we align the $PATH with our new environment setup. Now, when you execute commands like ls /, it reflects the contents of your new root, such as /home/iammuho/namespace1 for namespace1, illustrating that the root has been successfully changed.
Now, let's demonstrate the isolation between the two namespaces by creating unique files in each and then checking their visibility. This will help us understand if the namespaces are indeed functioning as isolated environments.
Creating a File in Namespace1:
In namespace1, create a file named
namespace1.txt:
touch namespace1.txtCreating a File in Namespace2:
Similarly, in namespace2, create a file named
namespace2.txt:
touch namespace2.txtVerifying Isolation:
Next, we use the
lscommand in each namespace to list the files.When you execute
lsin namespace1, you'll seenamespace1.txtbut notnamespace2.txt.

Conversely, in namespace2,
lswill shownamespace2.txtbut notnamespace1.txt.

Conclusion of the First Installment: Namespaces and Filesystem Isolation
In this first part of our series, we have successfully established the basics of Linux namespaces with a focus on filesystem isolation:
Namespace Creation: We started by creating two separate namespaces,
namespace1andnamespace2, laying the groundwork for our exploration of namespace isolation.Setting Up Independent Filesystems: We installed a minimal Linux filesystem (using Alpine Linux) in each namespace, ensuring that each had its own distinct environment.
Applying
pivot_root: Thepivot_rootcommand was used to switch each namespace to its new root filesystem, enhancing isolation and setting the stage for independent operations.Verifying Isolation: By creating unique files in each namespace and observing their visibility, we demonstrated the effective isolation between the two namespaces. This was a crucial step in understanding how namespaces provide separation and security.
Looking Ahead: IPC and UTS Namespaces
In our next installment, we will delve into the isolation of Interprocess Communication (IPC) and UNIX Time-sharing System (UTS) namespaces. These aspects are critical for understanding how processes communicate and identify themselves in isolated environments, further expanding our knowledge of Linux namespaces and their practical applications.
Stay tuned for a deeper exploration of these advanced topics, where we'll see how namespaces extend beyond filesystem isolation to other key areas of the Linux operating system.